Set up Custom Event Tracking
Show’s Omniscript Tracker helps users track their leads across channels with or without the use of videos.
Getting started with tracking custom events on Show elevates your marketing experience and gives you a better understanding of how your customers view your video, your website, and engage with your communications pipeline. From email, to video player, to landing page, to website - Show helps you set up custom events across the funnel and lets you gain critical insights about your user throughout the flow.
Using Show with custom events lets you design and automate targeted campaigns and helps you address add more context and insight into your customer solutioning.
Note:Tracking an attribute like User name, Contact details, and Designation can be activated by default on Show. This article is to help you set up custom event and attribute tracking for websites, landing pages, and apps and helps you track events like website button clicks, etc.
Examples of Events to add on Show
Type of Event | Definition | Use cases |
|---|---|---|
Button and Page Clicks | Set custom events to track the number of clicks each of your clickable elements garner to get a better understanding of your audience. It also helps you to drill down your funnel in a better manner. | Marketing, Sales, L&D |
Abandoned Form Fill | Track the abandoned form fills by setting up a custom event trigger | Marketing, Sales, L&D, Customer Success |
Installation of Your Extension(s) | Discover the people who have downloaded your extensions by setting up a custom event trigger to track extensions. | Marketing, Sales, Customer Success |
Items added to cart | Track the items that are added to the cart. You can identify the items that are being added to the cart. You can identify the items that are frequently being added to the cart or you can identify the combination of items that are added together in the cart and can give shape to your strategy accordingly. | Marketing, Sales, Customer Success |
Returning Users | Setting up this custom event helps you the recurring visitors on your website. | Marketing, Sales |
Hotspot/Toolkits Hover | Track the number of times someone has hovered over the hotspots/toolkits you have set up on your website. You can discover the areas of product in which your customers are seeking additional information. | Marketing, Sales, Customer Success |
Lesson Completions | Track lesson completions by setting up relevant custom event triggers that denote lesson completions. | L&D, Onboarding |
Refund | Set custom event triggers to identify customers who have opted for a refund on your product. | Marketing, Sales |
Getting Started
With Show’s lightweight JavaScript snippet installed on your website or applications, you can track critical events that your visitors and users engage with on your channels and collect that data on your Show dashboard.
Within Show’s settings, click on the Installation option. Copy the script code needed to start tracking custom events and attributes from your channels and follow the steps on the page to complete the installation process.
Note:Paste the code on all the pages you wish to track along your user journey map
<script>
window.ShowAttributes = {
  account_id: "<?php echo json_encode($current_user->accountid) ?>", // Mandatory Field - Find account id in the in-app installation page
  fname: "<?php echo json_encode($current_user->name) ?>" , // Full name
  email_id: "<?php echo json_encode($current_user->email) ?>" , // Email address
  created_at: "<?php echo strtotime($current_user->created_at) ?>" // Signup date as a Unix timestamp
};
</script>
<script src="https://static.getshow.io/play/custom/show.custom.latest.js" type="text/javascript" async></script>
<script>
window.ShowAttributes = {
account_id: "<%= current_user.accountid %>", // Mandatory Field - Find account id in the in-app installation page
fname: "<%= current_user.name %>", // Full name
email_id: "<%= current_user.email %>", // Email address
created_at: "<%= current_user.created_at.to_i %>" // Signup date as a Unix timestamp
};
</script>
<script src="https://static.getshow.io/play/custom/show.custom.latest.js" type="text/javascript" async></script><script>
window.ShowAttributes = {
account_id: "{{ request.user.accountid|escapejs }}", // Mandatory Field - Find account id in the in-app installation page
fname: "{{ request.user.name|escapejs }}", // Full name
email_id: "{{ request.user.email|escapejs }}", // Email address
created_at: "{{ request.user.date_joined|date:"U" }}" // Signup date as a Unix timestamp
};
</script>
<script src="https://static.getshow.io/play/custom/show.custom.latest.js" type="text/javascript" async></script>Show JavaScript API
After installing Show’s js omniscript on your website or applications, you can track critical events that your visitors and users engage with on your channels and collect that data on your Show dashboard.
1. Generate API Access Token
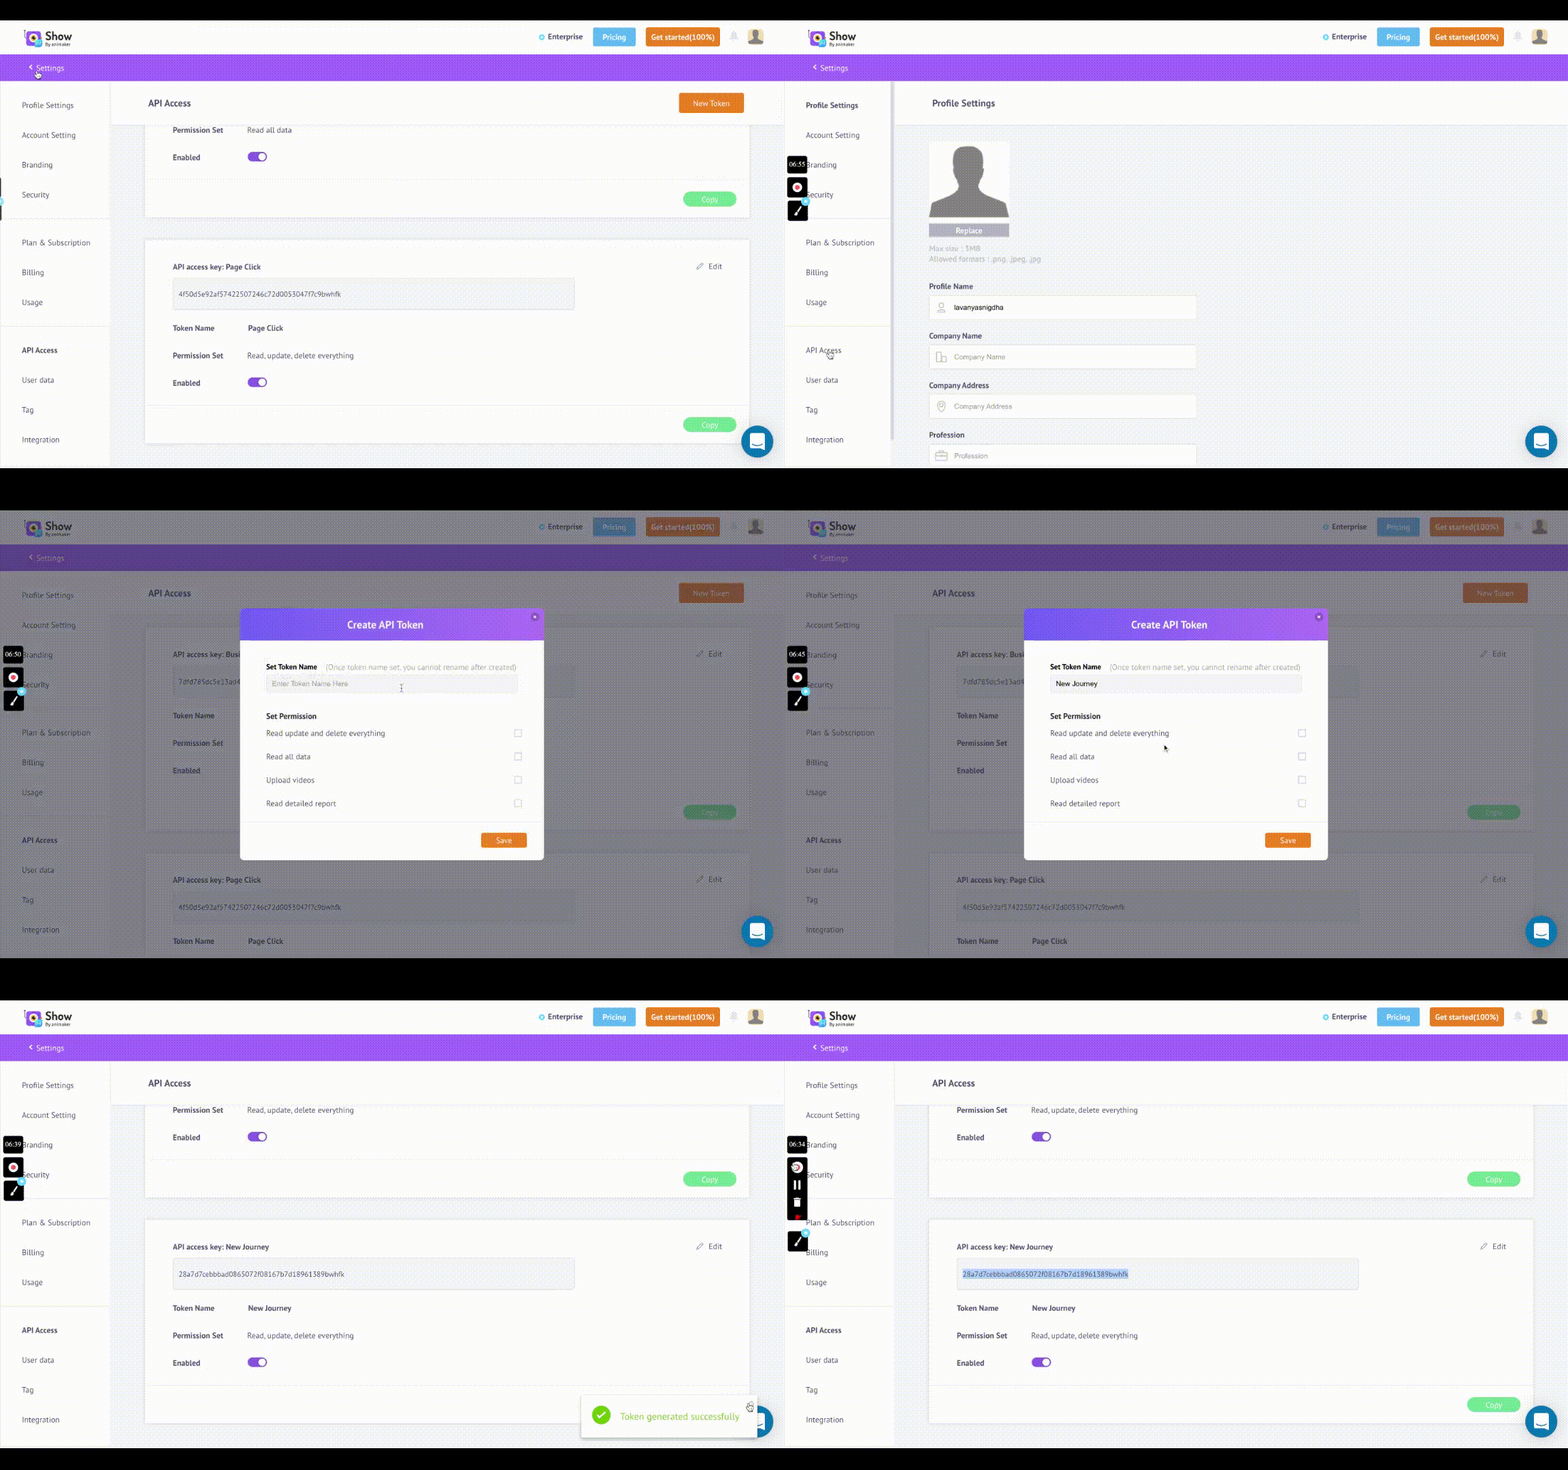
To get started, within Show’s settings, click on the API access page. Create a new token and give it the appropriate access permission.

E.g.: To enable a custom event where page clicks are tracked, you would give the Read/Write access permission and generate the API key.
2. Write a MetaTitle and Description
Note down the desired Title for the event and an optional description.
For example, if we wish to track video downloads on a website, the title and description could be:
Title: “Video was downloaded”
Description: “User downloaded a video from the landing page”
3. Script Format
The above mention example would would be tracked with the script:
<!DOCTYPE html>
<html>
<head>
<title>Page Title</title>
</head>
<body>

<h1>This is a Heading</h1>
<p>This is a paragraph.</p>
<script>
function myFunction() {
  window.ShowVFM && window.ShowVFM("a15900c9fa0c834a6647b2773988c8b50ea04owgox")(
  {
    event_name: "video-download",
    description: "New video was downloaded",
    event_text: {
      Title: "New video was downloaded",
      Description: "New video was downloaded",

    }
  }
)
alert("hi")
}
</script>

<button onclick="myFunction()">
CLicked Download
</button>
<script src="https://static.getshow.io/play/app.bundle.js" type="text/javascript" async></script>


</body>
</html>
Updated 9 months ago